Origami Day Lily

The gorgeous origami Day Lily is one of the prettiest flowers!
Any type of paper works well for this design, though I think proper origami paper (which is slightly thinner than office paper) works the best!
|
You can use paper that is white on one side - this will make the bottom part of the Day Lily white, as you can see in this photo. If you use double-sided paper then the whole flower will be coloured! Here's a suggestion: make lots of different colours! If you would like to download printable pdf of the Day Lily instructions, they are coming soon! I'll post them on this page... |
  |
 1. Start with a square piece of paper, white side up. Fold the paper in half along diagonals, crease well and open. |
 2. Turn the paper over to the coloured side. Fold the paper in half both ways, crease well and open. |
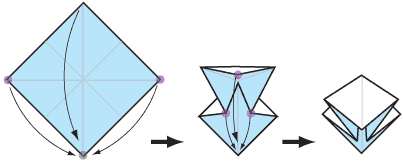 3. Using the creases you have made, Bring the top 3 corners of the model down to the bottom corner. Flatten model. |
 4. Rotate model so open part is at the top. Fold right section (of top layer only) to the left along the crease shown. |
 5. Fold the other side over along the crease shown (top layer only once again) |
 6. Fold top triangle in half along vertical crease and open out again. |
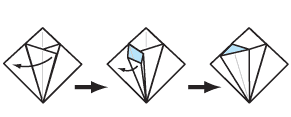 7. Open out the uppermost |
 8. Diagram is enlarged. Fold the sides inwards to meet in the centre along the creases shown. Open out again. |
 9. Using the creases made in step 8, hold model at point shown and pull down along new crease shown. |
 10. Repeat steps 7 - 9 on the right hand side. |
 11. Turn over and repeat steps 4 - 10 on the back. |
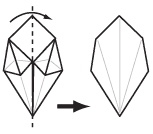 12. Fold top layer to the side. |
 13. Turn over and repeat |
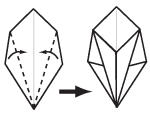 14. Fold the outer edges of the top layer in to the centre line. |
 15. Turn over and repeat step 14 on the other side of the model. |
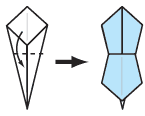 16. Fold top layer downward along this crease. |
 17. Repeat on all sides to open out flower. Finished Day Lily! |
Click Here to see the Lily, a similar design to the Origami Day Lily
